Using Quickbooks
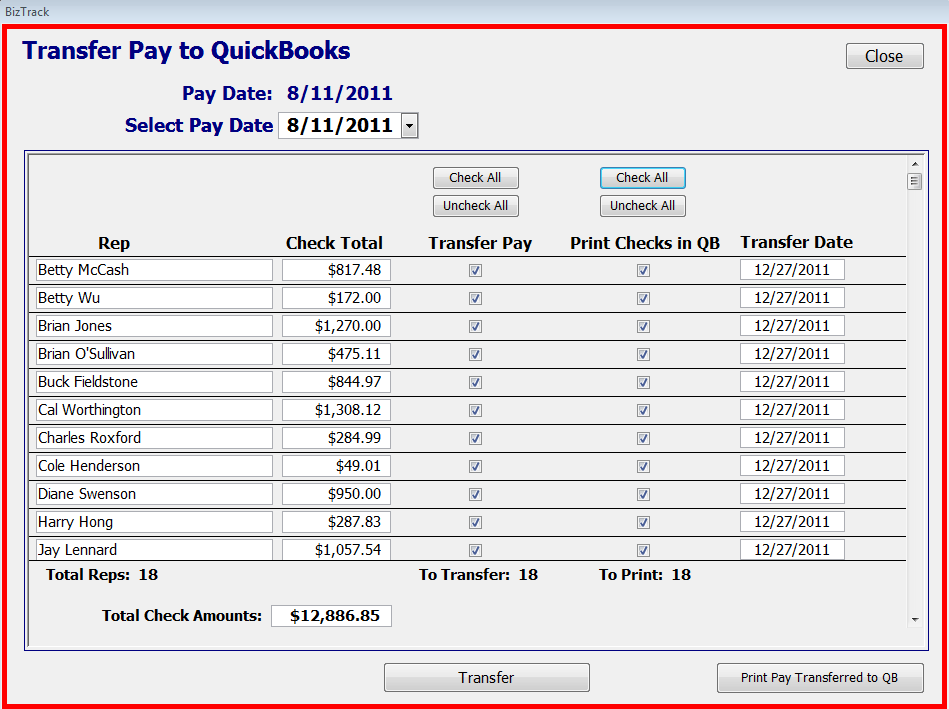
This form is used to select the checks you would like to transfer to Quickbooks.

Step 1: Select a Pay Date you would like to transfer information from. If checks have been transferred, they will not appear in the list below.
Step 2: Click on the "Check All" button above the "Transfer Pay" to select all the Reps and Pay to be transferred. If you prefer to not send all then click on the individual boxes under "Transfer Pay" to uncheck them.
Step 3: Click on the "Check All" button above the "Print Checks in QB" to select all the Reps that you would like to prepare a check ready to print in Quickbooks for. If you prefer to not prepare a check ready to print for all Reps then click on the individual boxes under "Print Checks in QB" to uncheck them.
Step 4: When ready, click the "Transfer" button. This will open up a form where you can follow the instructions to select the appropriate Quickbooks accounts you would like to transfer to. Check with your Quickbooks program to find the correct account names. At the bottom of this help page you will find the instructions for the next step.
Transferring Pay to Quickbooks
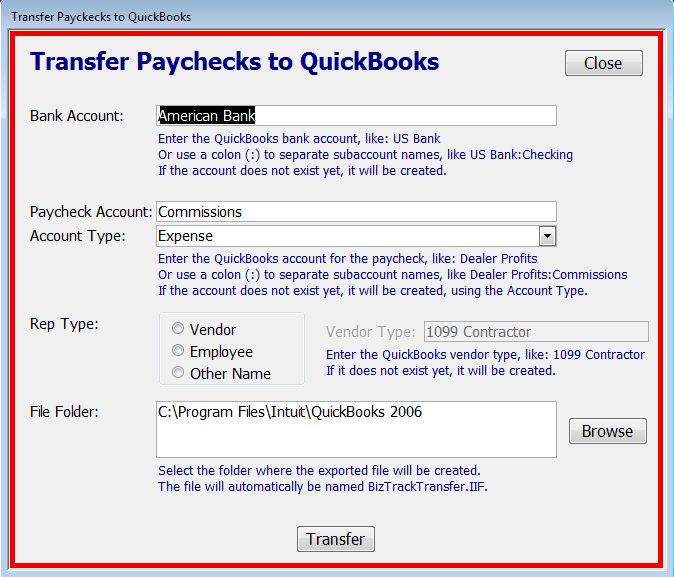
This form is used to select the account names in Quickbooks where the Pay will be transferred to.

Step 1: Follow the instructions on the form to select the appropriate Quickbooks accounts you would like to transfer to. Check with your Quickbooks program to find the correct account names.
Step 2: If needed, click on the "Browse" button to select the file where the exported file will be created. The file will be named "BizTrackTransfer." You should export it to your current Quickbooks folder usually found in C:\Program Files\Intuit\QuickBooks 2006, for example.
Step 3: Click on the "Transfer" button which will create a file called BizTrackTransfer.IIF. This file will be imported into Quickbooks.
Step 4: Import the file into Quickbooks using the following steps:
1.) Open up Quickbooks to the company you want to import to.
2.) On the Menu bar, click on "File" then select "Utilities" then "Import" then "IIF Files"
3.) An Import window will open displaying all your files. Look for the file named "BizTrackTransfer" and double click on it. It will be in the folder that you chose in Step 2.
4.) A message should pop up saying "Your data has been imported."
You are now ready to access the information in Quickbooks.
Be careful to only import the same file once. Importing the same file twice will duplicate records. When you transfer over new records such as next week's Pay, a new "BizTrackTransfer" file will be created that over-writes the old one which you can import in the same way using Step 4.